
Broadcasts in Bonzo allow you to send a single message to a small group or a large list of prospects at once. You can send a broadcast through:
- Text (SMS)
- Voicemail Drop
Using the Broadcast Builder, you can easily choose your audience, compose your message, and schedule delivery — including the option to send large broadcasts in batches. Below you'll learn how to build and send broadcasts, view and filter broadcast history, and take action on sent, scheduled, canceled, or failed broadcasts.
Staring a Broadcast
You can open the Smart Broadcast Builder from three places:
- People tab: Select prospects in the People tab and click the Broadcast (megaphone) icon in the Quick Action Bar. Your selection is used as the audience, and the builder opens directly at the Message step.
- Broadcasts page: Navigate to Messaging > Broadcasts and click the Build Broadcast button at the top of the page. The builder opens at the Audience step, where you choose who receives the message. If you haven't built an audiences or views, a link will direct you back to the People tab.
- Pipeline stage: Navigate to Pipelines and select a Pipeline. Within the stage view, clicking on the three vertical dots or breadcrumbs will allow you to launch a broadcast for every prospect currently in that pipeline stage. Here the audience selection is skipped and you will go directly to the message composer.
Building your Broadcast
The builder guides you through three steps: Audience, Message, and Schedule & Review. You can move back to any earlier step at any time without losing your work.
Step 1: Audience
The Audience step defines who receives your broadcast.
- Starting from the Broadcasts page: Choose from your saved People tab Views. Each view shows its name and a summary of its filters. Select a view and click "Use this View" to continue.
- Starting from the People tab: This step is already complete — the prospects you selected are your audience. You can click back to the Audience step to review your selection or switch to a saved view instead.
To learn more about creating a Views, click on the link below:
People: Formatting, Custom Fields & Views, Importing
Step 2: Message
Choose your channel — Text, Email, or Voicemail — and compose your message.
Text (SMS)
The SMS composer includes the same tools as 1:1 messaging:
- Merge fields — click the Merge Tags button (or press #) to search and insert personalization tokens like first name
- Image, GIF, or video attachments (one media attachment at a time)
- Emoji picker, Content Studio, and Quick Replies
- A live segment and character count, with a best-practice tip if your message runs past 150 characters
- Token total for the broadcast message
The email composer includes a subject line (required), a full rich-text editor, and the same content tools as 1:1 email:
- Merge fields, GIFs, Content Studio, and Quick Replies
- File attachments (PDF, DOCX, JPG, PNG — up to 10 MB each)
- Email provider selection: Send from your Integrated email (your connected inbox — replies flow into your conversations) or the Marketing server (Bonzo’s high-volume sending infrastructure). Batched email sends default to the Marketing server for deliverability.
Voicemail Drop
Record a new voicemail, choose a saved template, or upload an audio file (MP3, M4A, or WAV). You can preview your recording with a built-in player and select the Caller ID your voicemail is sent from.
Save as Template
In any channel, check "Save as template" and give your message a name to save it for reuse. SMS and email messages are saved to your Quick Replies library; voicemail recordings and uploads are saved to your voicemail templates. View all templates in your Content Library
To learn more about Content Library, click on the link below:
Content Library
Step 3: Schedule & Review
The final step controls when your broadcast goes out and shows a full summary before you send.
- Send immediately: Leave the date and time blank (default empty) and click Send broadcast.
- Schedule for later: Set both a date and a time, then click Schedule broadcast.
- Send in batches: Turn on batch sending to deliver your broadcast in waves instead of all at once (see below).
Below the scheduling controls, an inline review summarizes your audience, message, and delivery settings, with Edit links to jump back to any step. You’ll also see the estimated token cost for the send.
After sending, you’re redirected to the Broadcasts page, where the broadcast appears in your history.
Batch Sending
Batch sending spreads a broadcast out over time so responses arrive at a pace your team can keep up with, and helps protect deliverability on large sends.
- Batch size: How many prospects receive the message in each wave (default 50, up to 5,000).
- Delay between batches: How long to wait between waves (default 30 minutes).
- Timeline preview: A visual timeline shows when each batch will go out and the estimated completion time, updating live as you adjust settings.
Audiences of 5,000 or more: Batch sending is required for broadcasts to 5,000+ prospects. The "Send Now" option is replaced with "Set up batch send," and a banner explains that broadcasts of this size go out in batches to protect deliverability. Scheduled batch broadcasts release their first wave at the scheduled time.
Where to View Your Broadcasts
To view past, scheduled, or canceled broadcasts:
- Navigate to the Messaging section on the left side of the platform.
- Click the Broadcasts tab.
This opens your Broadcasts Dashboard, which serves as your broadcast history and activity log.
Understanding the Broadcasts Dashboard
On the Broadcasts screen, you’ll see broadcasts that are All, Scheduled, or Sent. Each broadcast row includes key details such as:
- Sent date/time
- Broadcast type (Text, Email, or Voicemail Drop)
- User who sent it
- Number of recipients
- Message content preview (when applicable)
Scheduled: Broadcasts set to send at a future time, including batch broadcasts still in progress.
Sent: Broadcasts that have already been delivered or processed.
Filtering Broadcasts
The Broadcasts Dashboard includes advanced filtering to help you quickly locate specific messages. Available filters include:
- Message Type: Text, Email, or Voicemail Drop.
- Sender: Broadcasts sent by a specific team member.
- Text Content: Search message text using conditions such as contains, does not contain, equals, or does not equal.
- Prospect Count: Filter by number of recipients (equals, greater than, less than).
- Date Sent Preset: Today, this week, this month, last X days or months, or a custom range.
You can reset filters at any time to return to the full broadcast list.
Exporting Broadcast History
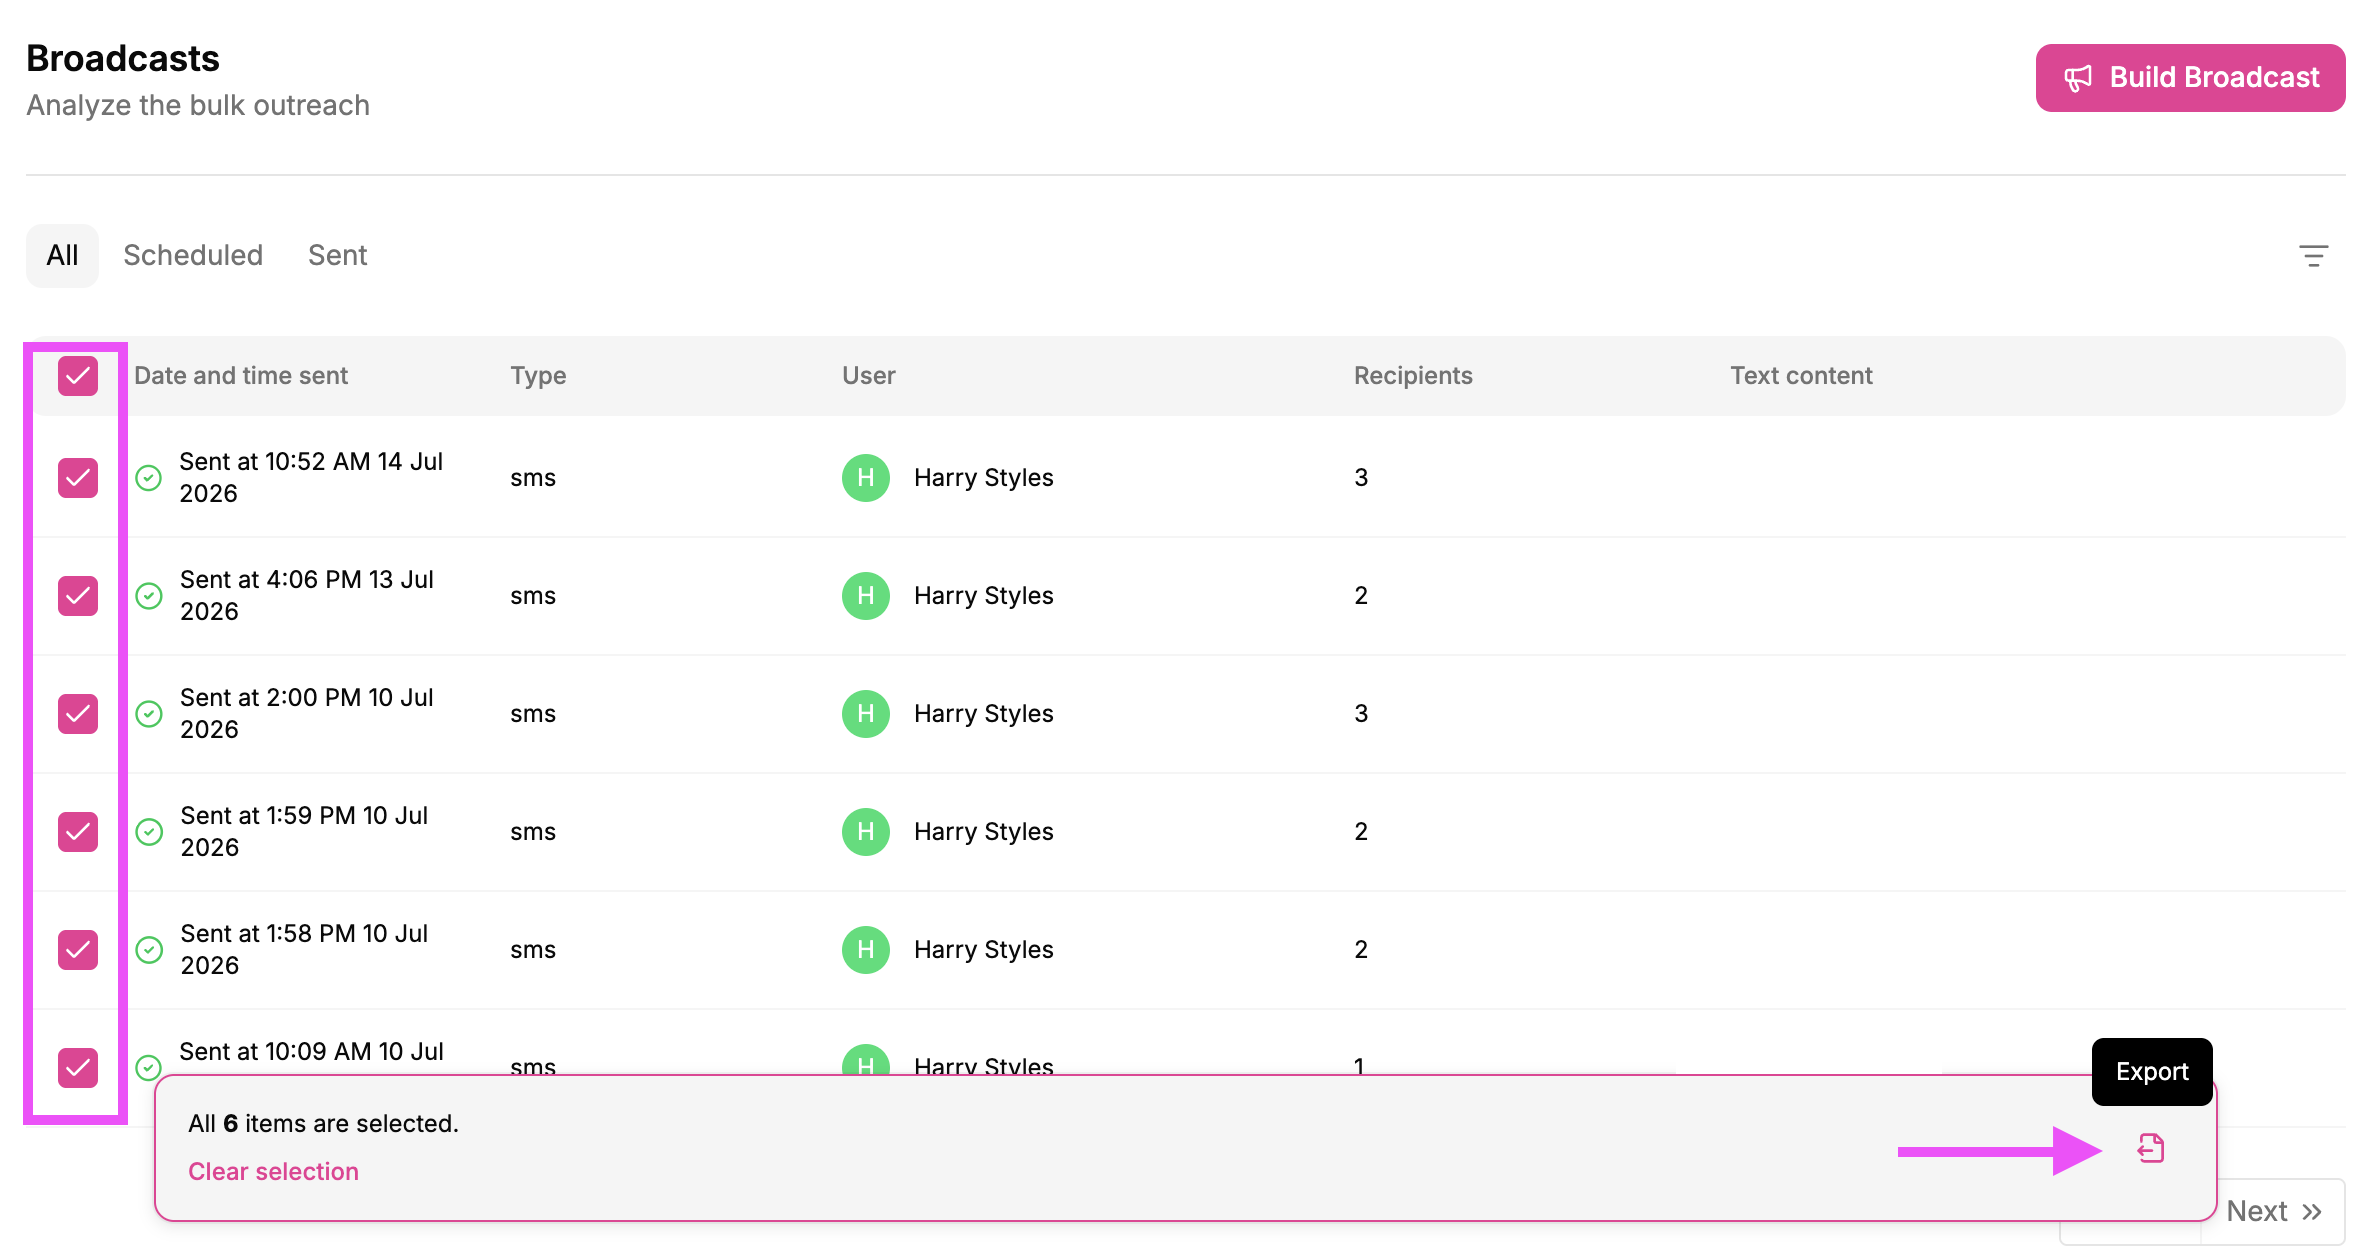
- Select All broadcasts or choose specific broadcasts.
- Click Export.
The export will be emailed to you as a CSV or Excel file.
Viewing Broadcast Details
Clicking into a broadcast opens the Broadcast Detail View. At the top, you’ll see the sent date/time, channel, message content, and a recipient summary.
Below that is a prospect-level list showing every recipient, including:
- Broadcast ID and prospect name (clickable)
- Campaign (if applicable), prospect status, and created date
- Assigned user, last response, and last contact
- Email opened (Yes/No) — email broadcasts only
- Delivery status and error message (if applicable)
Clicking a prospect name takes you directly to their Prospect Profile.
Filtering Failed Messages & Error Details
Within a broadcast’s detail view, you can filter recipients by delivery outcome (Successful or Failed). For failed messages, you can further filter by error details using conditions like contains or equals — helping you quickly identify why messages failed (e.g., invalid number, carrier block, unsupported line).
Taking Action on Failed Broadcast Recipients
When viewing failed recipients, you can select one, multiple, or all prospects and take action using the Quick Action Bar at the bottom of the screen. Available actions include:
- Move to a different campaign or pipeline
- Assign to another user
- Send a new message (SMS, Email, or Voicemail Drop)
- Launch the auto-dialer
- Add tags or notes
- Manage groups, update status, or share contacts
This allows you to immediately follow up with prospects whose messages failed — without leaving the Broadcasts section.
Editing or Canceling a Scheduled Broadcast
- Locate the scheduled broadcast.
- Click the three-dot (ellipsis) menu.
- Choose to edit the message or scheduled send time, or cancel the broadcast.
If canceled, the status updates to a red X and the cancellation time is recorded.
The Smart Broadcast Builder walks you through audience, message, and scheduling in one guided flow, with batch sending to keep large broadcasts deliverable and response volume manageable. The Broadcasts Dashboard provides a complete view of your broadcast activity — past, scheduled, canceled, and failed — with advanced filters, prospect-level tracking, exports, and built-in follow-up actions so you can diagnose delivery issues and act without breaking your workflow.